- Posts: 934
- Thank you received: 133
Cubo 15
- Cubo15
-

- Offline
- Platinum Member
-

Less
More
8 years 11 months ago #23764
by Cubo15
Replied by Cubo15 on topic Cubo 15
@ROSSSSS224: Could you post a picture of 2 x Cubo 15 on top of each other, Cubo Kick on the Cubo 15's (sideway placement) and the MT101 on top of that, kind of setup? Pretty please?
How would you rate your setup, are they a good match?
@Ricosound: I would test which handle placement feels the best ergonomically and then build them both that way. Meaning that for one cabinet, you would have to close up the created holes that are no longer in use. I also think it´s important to use handles that can easily fit your hands:
www.penn-elcom.com/default.asp?MC=01030601&LG=EN
In short: You're not going to notice the influence of the handle placement, or the volume they take up in either the horn or chamber. If you want the longer explanation, I'm pretty sure it's in the thread, by now at least three times!
Talking about a stained wood finish, these are the Cubo 18's from Olaf, with the following layers:
- Black ebony dye
- Dark walnut dye
- Schellac (without wax) seal coat
- 8x Polyurethaan satin varnish
The handle (of personal design) and placement is how I like the handles on Cubo 15 and Cubo 18.


Best regards
Cubo
How would you rate your setup, are they a good match?
@Ricosound: I would test which handle placement feels the best ergonomically and then build them both that way. Meaning that for one cabinet, you would have to close up the created holes that are no longer in use. I also think it´s important to use handles that can easily fit your hands:
www.penn-elcom.com/default.asp?MC=01030601&LG=EN
In short: You're not going to notice the influence of the handle placement, or the volume they take up in either the horn or chamber. If you want the longer explanation, I'm pretty sure it's in the thread, by now at least three times!
Talking about a stained wood finish, these are the Cubo 18's from Olaf, with the following layers:
- Black ebony dye
- Dark walnut dye
- Schellac (without wax) seal coat
- 8x Polyurethaan satin varnish
The handle (of personal design) and placement is how I like the handles on Cubo 15 and Cubo 18.


Best regards
Cubo
Please Log in or Create an account to join the conversation.
- Cubo15
-

- Offline
- Platinum Member
-

Less
More
- Posts: 934
- Thank you received: 133
8 years 11 months ago #23765
by Cubo15
Replied by Cubo15 on topic Cubo 15
Please Log in or Create an account to join the conversation.
- ricosound
-

- Offline
- Senior Member
-

Less
More
- Posts: 42
- Thank you received: 2
8 years 11 months ago #23767
by ricosound
Replied by ricosound on topic Cubo 15
hi cubo
thanks for the reply...I have finished the build of the first cube with the handle in the chamber so I think I am going to leave it like that. On the second one though I;ve placed it in the horn, I guess it a bit live and learn ...maybe if I want to have a symmetric look for the cubes I'll build a 3rd one. So far handle in the horn is the solution I prefer.
Used truck bed liner paint but the outgassing of it is too tuff so I think I'm changing approach for the second Cubo. Here in the USA Warnex is not easily available so I bought Duarte , also water based.
I will do the second Cubo with this....
I really like the stained wood effect on those photos, it looks like those ones were put together without screws ? I've used screws to fix panels etc so I had to fill in the holes etc to get a smooth surface I am not sure if I can get such a clean look like the boxes in the pics. I know some people put them together with only PL glue and no screws...
Also in some areas first skin layer of plywood peel off in small parts making defect that are hard to cover by sanding and staining. Will have to look more into this as I would like to build the 12" version in the future.
I will defiantly send you a mail about the whole stain approach as it is something that I really like as finishing.
Please Log in or Create an account to join the conversation.
- ricosound
-

- Offline
- Senior Member
-

Less
More
- Posts: 42
- Thank you received: 2
8 years 11 months ago #23768
by ricosound
Replied by ricosound on topic Cubo 15
these are just some photos of the current Cubo building , last one is the first one I've built that needs to be finished by painting it....I found out only recently that I can use a CNC machine so that will make the cutting phase much easier and precise. I engraved the sound system logo not he front panels of both boxes...
I am wondering if I can avoid to paint the interior of the box, I did paint it on the first build before 100% assembly of the 2 outer panels. But I was wondering if I could just finish up the whole box with the assembly part , then go into paint phase at closed box and avoid to pain the hard to reach and not visible from outside parts. Some vintage speakers I've opened was not painted on the interior.
I sealed all panels joints well with PL glue so there shouldn't be air leaks there....I thouhgt one option could be to paint the interior with a water base acrylic or clear paint and use Duratex on outer and visible areas, so that it will last longer for other projects.
what are your thoughts on it ?
thanks a lot for all the info !
- Cubo15
-

- Offline
- Platinum Member
-

Less
More
- Posts: 934
- Thank you received: 133
8 years 10 months ago #23773
by Cubo15
Replied by Cubo15 on topic Cubo 15
That's a nice logo, definitely adds a nice touch to the cabinets appearance.
I've never painted the inside of a cabinet completely and if I did it was mostly to get the paint out of the roller or to not get stuck with a bit leftover paint. However I do recommend painting anything visible to the naked eye. So the horn/ mouth, till just around the corner and also a overlap with the area where the speakon connectors and handles are placed.
That should do it, unless you're also using them as a boot-anchor.
Best regards
Cubo
P.S. Those 6 cm bracings in the horn mouth are right where you want them but those above it, in the horn chamber have little added benefit in the corner, whereas if you place them on 1/3 and 2/3 interval on the front panel, they will act as bracing there. However practical applications have shown, that if you're not feeding your Cubo 15's around a 1000 W or more, you don't have to add them in that position necessary.
The following user(s) said Thank You: ricosound
Please Log in or Create an account to join the conversation.
- ricosound
-

- Offline
- Senior Member
-

Less
More
- Posts: 42
- Thank you received: 2
8 years 10 months ago #23774
by ricosound
Replied by ricosound on topic Cubo 15
hi Cubo,
thanks for the reply...I'm planning to paint the Cubo in black ( just received some Duratewx paint- that is what I could find in terms of water based cabs paint here in the US ) and the logo should be stained white color...sort of a contrast effect.
I'm laser cutting the stencil of the front logo so I should be able to just fill the letters with plexyglass letters and run the roller with black paint over them without having the black paint into the fill part of the logo. At least thats the plan... ..I will post some photos soon.
I have place the 6 cm wide bracing at the fare left and right ( long one below the baffle , short one above int he chamber ), then the other 2 short ones at 1/3 and 2/3 position on the baffle edge toast as bracing. So that the front panel is braced by 4 short posts, I trues that is what you meant.
I will be using a JBL 2226H 600W driver.
thanks a lot for all the help
thanks for the reply...I'm planning to paint the Cubo in black ( just received some Duratewx paint- that is what I could find in terms of water based cabs paint here in the US ) and the logo should be stained white color...sort of a contrast effect.
I'm laser cutting the stencil of the front logo so I should be able to just fill the letters with plexyglass letters and run the roller with black paint over them without having the black paint into the fill part of the logo. At least thats the plan...
I have place the 6 cm wide bracing at the fare left and right ( long one below the baffle , short one above int he chamber ), then the other 2 short ones at 1/3 and 2/3 position on the baffle edge toast as bracing. So that the front panel is braced by 4 short posts, I trues that is what you meant.
I will be using a JBL 2226H 600W driver.
thanks a lot for all the help
Please Log in or Create an account to join the conversation.
- ROSSSSS224
-

- Offline
- New Member
-

Less
More
- Posts: 4
- Thank you received: 0
8 years 10 months ago #23780
by ROSSSSS224
Replied by ROSSSSS224 on topic Cubo 15
Hi cubo,
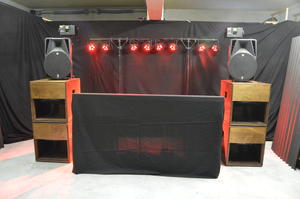
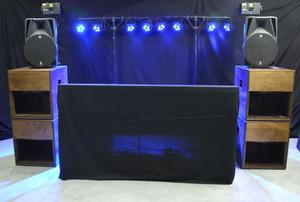
Got these photos but will get the ones requested when I ge a chance! So far seems a greatmtach for a mid size rig. The subs certainly come to life in fours with the proline
Got these photos but will get the ones requested when I ge a chance! So far seems a greatmtach for a mid size rig. The subs certainly come to life in fours with the proline
- Cubo15
-

- Offline
- Platinum Member
-

Less
More
- Posts: 934
- Thank you received: 133
8 years 10 months ago #23781
by Cubo15
Replied by Cubo15 on topic Cubo 15
Nice paintjob! It's always impressive how much difference a good paint job can do for the end result. Is the logo a one-timer or is it going to end up on all cabinets?
All riight, more pictures in the near future, I'll (hopefully) await patiently.
Best regards
Cubo
All riight, more pictures in the near future, I'll (hopefully) await patiently.
Best regards
Cubo
Please Log in or Create an account to join the conversation.
- ricosound
-

- Offline
- Senior Member
-

Less
More
- Posts: 42
- Thank you received: 2
8 years 10 months ago #23786
by ricosound
Replied by ricosound on topic Cubo 15
greetings !
just wanted to share a photo of last night session...Cubo 15 extended on the bottom , not fully painted but sounding REALLY good ...thanks again Mr Cubo for sharing knowledge.
Used as bass section, JBL 2226H 600W 8ohm drivers in parallel. Powered by QSC PLX 2402 in stereo at 4ohm, out of one channel. Tuned at 35 to 180 Hz...
- wintrmute
-

- Offline
- New Member
-

Less
More
- Posts: 3
- Thank you received: 0
8 years 10 months ago #23798
by wintrmute
Replied by wintrmute on topic Cubo 15
Hi everyone, and thanks to the creator of the Cubo15 plan.
I've almost completed building a Cubo15 using a Kappalite 15" driver.
I went with the non-extended build, but I'm now wondering if I should try and retrofit the extra panel into the horn to make the Cubo Extended version?
(I've scanned through the history here and don't remember seeing anything specifically mentioning the Kapplite=Extended, but looks like similar drivers DO get that recommendation?)
The big triangular support panel will get in the way, but I can cut a slot into the extended panel to allow it to fit.
What would I be missing out on if I don't go with the extended version?
Cheers!
Please Log in or Create an account to join the conversation.
Time to create page: 0.458 seconds


